Wednesday 29 February 2012

Scone-athon Part 1: Hickory Smoked Nuts & Seeds Scones


Other Scone-athon posts
Part 2: Nutella Scones
Part 3: Plain Scones

It's quite rare at the moment that I bake just for me. In fact, I don't think I've baked just for me in my life (I don't count pancakes, they're cooking, not baking). So today, when my free Graze box turned up (a full review of this to follow once I've eaten the other bits) and I discovered they'd sent me Hickory smoked nuts and seeds, something I wasn't that enamoured with on its own, I decided to make it better by baking it into something on a small scale. This was MY free graze box and I was going to eat it all myself.

A savoury quick bread? Hmm, the pot seemed a bit small. Then I realised, after the success of cinnamon toast earlier this week, that my breakfast routine did still need some shaking up. I wanted scones.


I'm going to let you in on a secret. I've joined the daring bakers. I couldn't do last months because I signed up too late but I get my first challenge tomorrow (which my boyfriend and family know all too well because I've been reminding them every day for the past week. I don't think I'll be able to sleep tonight... I'm more excited about this than I was about xmas). But while waiting, I've been going through the past challenges and I came across Audax from Audax Artifax's extremely exhaustive scone recipe. This is a treatise on how to make PERFECT scones. Cheaply. And the recipe could easily be halved. Thank you very much, Audax!

So I made 3 scones, and, like Audax promised, they were great. I can't wait to try this recipe as standard jam and cream scones, and I think that it could even be put to use for cricket teas instead of buying the Tesco value ones in bulk - I think it would work out ALMOST cheaper and taste infinitely better. I calculated that this cost me approximately 30p to make 3 scones. Let me repeat that. THIRTY. PENCE. 10p a scone. And that was using real butter (we'd probably cheat and use the hard stork for cricket scones) and we'd buy flour in bulk, which I didn't, I can only buy 500g bags because that's all our Tesco's sells and its all I can manage to cart the mile I walk home (carrying a 5 litre bottle of water one day, plus all my other shopping, was not fun). After scaling it up to 64 scones, using good quality flour and butter, I worked out it would cost 6 point 3 pence a scone. That really isn't bad at all... but sadly Tesco value manage to undercut us at 4 and a half pence per scone. Really, though, is there any comparison?


Anyway, I had decided to make the scones. Now, I've finally proved that I have food on the brain far too much. Midway through my IM conversation with my boyfriend, I proceeded to reel off NINE foodie puns. All entirely based on the scone recipe I'd just written out. Though in fairness he started it.


Me: right, lecture written up.... it's scone time
Boyfriend: so you will soon be... scone?
Me: yes, but not scone for good
Boyfriend: but you'll be scone for a good raisin
Me: and i'll be breadcrumbin' back
Me: i shall return sift-ly
Boyfriend: oh dear
Me: i butter not take long....
Me: yours was better
Me: I knead to practice my puns
Me: they're a bit half-baked
Boyfriend: damnit
Boyfriend: just thought that
Me: i should stop milking it.....
Boyfriend: ugh
Me: i bet your eyes are starting to glaze over
Me: ...... dough.
Me: anyway, i'm going to go before the pun god smites me


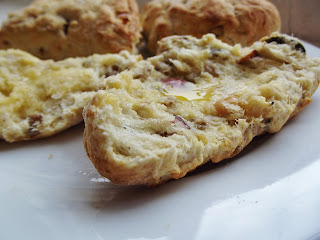
All in all, this took me about 10 minutes to make, and I washed up while they cooked. Mine didn't rise quite as much as Audax's, but I'm going to have so much fun practising that I really don't care this time round ;) They're certainly not super dense, and really I rolled it out a bit thinner than I should have (well, patted, I'm a student, I don't have a rolling pin), sooo... it was to be expected. I think I also kneaded them very slightly too much, so will cut back on that next time. Finally, Audax recommends frozen grated butter. This would be fine, apart from my lack of 2 important things. 1) A grater. 2) A freezer. So I just used the hard butter straight out of the fridge and diced it.

Mine cooked in 8 minutes flat, and smelled gorgeous. Then, in the interests of having one to photograph, I supposed I ought to break one open, butter half of it, and  photograph it. The only problem was that I got distracted and buttered both halves (though it was the smallest of the three). Obviously I couldn't then waste the buttered half. My camera had a Lazarus moment and lasted long enough for me to get some shots, and it's sunnier here today so I could use the natural light better. 


With butter on, delicious. I think it's going to be bloody awesome with some Nutella on for breakfast tomorrow! (Update: it was. It certainly was. *drools*)

In closing, I decided to try some of the nuts while they were being chopped up to pop in... and then realised that Graze knew me better than I knew myself because they were actually really nice. Whoops. Good call, guys... still, they work well in scones too.

Audax's Awesome Scone recipe, with nuts and seeds

You can find the original HERE, for those who aren't daring bakers (it's also available in the private forum). Here I've provide my scaled down recipe with a shortened method. I would highly recommend reading Audax's, though, as he put a huge amount of effort into getting perfect scones and I learned so much from reading it.

Makes 2-3 wedges or 4 round scones.

70g plain flour
1 teaspoon baking powder
1/8 teaspoon salt
15g butter (preferably frozen and grated, alternatively just out of the fridge and diced)
60ml milk
1/2 tbsp milk to glaze, or flour to dust
~35g Mixed nuts and seeds (I used Hickory smoked cashews, almonds, sunflower seeds and pumpkin seeds from a Graze box)


1. Preheat oven to 240 degrees c.
2. Triple sift the dry ingredients from a height.
3. Rub butter into dry until resembled beach sand (see Audax's recipe if you want a different texture). Stir in the nuts.
4. Add nearly all the liquid and stir until a sticky dough is just formed. Add the rest if needed.
5. Turn the dough onto floured board and knead softly 4 or 5 times.
6. Roll/pat out to 2cm thick. Will have to do this twice if doing circles.
7. Use knife to form squares or wedges (you could use a cutter to form 4 scones. I don't own cutters. Again, student.)
8. Place on baking tray and flour or glaze the tops.
9. Bake for 10 minutes, checking at 8. They are done when the sides are set.
10. Immediately place on rack to stop cooking process.

Tuesday 28 February 2012

Mary Berry's "Can't go wrong chocolate cake"... it's true!

My copy of Mary Berry's "Fast Cakes" arrived last week and I've been dying to make some things from it since. Mum has a lot of bake sales going on at the charity she works for so I was intrigued to see if any of these could become cost-effective, quick bake sale staples.

I decided to start with the "Can't go Wrong" chocolate cake mainly because of the name. It lived up to it. However, what I didn't take into account was the pre-prep... because that most certainly can.

I spent 40 minutes turning my room over looking for the tin of golden syrup I was 100% certain I'd bought, even going through all my receipts to check that I hadn't just meant to buy it and somehow forgotten... but there it was, in black and white. So where the bloody hell had it got to?

It was eventually solved when I called my boyfriend, who had visited last weekend, to ask if he remembered seeing it. He reminded me that we'd used it to prop open my broken sash window when we were making waffles.

Oh, yeah. Obviously.

The next problem came when I opened up my (second-hand, original edition) copy of the book, smoothed it open, and the first 50 or so pages promptly fell out. Luckily they all fell out in one lump, but still not a great start.


Once the cake was being made, however, it was an absolute dream. It took less than 10 minutes to get it into the pan and into the oven. The original recipe calls for 2 x 8 inch sandwich tin, but I only own 1 x 7 inch tin... but luckily Mary Berry had included some useful conversions, which basically concluded that what fits into 2 x 8 inch tins will fit into 3 x 7 inch tins... and I've always fancied trying to make a triple layer cake!

It was very forgiving. I got the temperature wrong for the first 10 minutes of the first layer - no problem. I had to leave the mixture to stand for an hour because I had to cook each layer separately - no problem. I managed to get the cake out, without even a hint of sticking, the moment it came out of the oven so I could reuse the tin immediately - that was a real novelty to me after getting used to trying to slide things out of my nightmarish 9 inch silicone tin!


A note on icing, however... do wait until the cake is completely cool. Also, like it says in the recipe, wait until you've taken it off the heat and it's thickened up a bit. I couldn't wait, as I had a lecture to get to, and as a result my cake tried to imitate the Leaning Tower every time I turned my back until it had set... However, in the end, it was alright. Not perfectly straight, but straight enough. I actually quite like how it looked because it just reminds me of something you would see at a school bake sale, something a little charmingly slapdash. A cake that doesn't take itself too seriously until you take a bite and realise that, despite the fact that you just bung everything in and whisk it, it's somehow incredibly light.

It's bizzare when, completely by chance, you stumble upon a recipe that takes you back to your childhood. The moment I took a bite of this cake I was transported back to being 7 or 8 years old, at my friend's house, having a piece of cake that either his Mum or Nan had made - I sadly can't remember that part. We had this cake quite often, and as soon as I took my bite today the taste and the texture brought the memories flooding back. It was a very nice moment. 

Update: Upon returning to the kitchen around 2 hours after leaving the cake in there for the people on my corridor, I found that 3/4 of it had already gone! I think that even breaks the Dulce de Leche brownies' record (5 hours for 9 pieces).


Mary Berry's "Can't Go Wrong" Chocolate Cake


I've slightly adapted the original recipe here to fit in 7 inch sandwich tins instead of 8 inch, as that's what I had. The original recipe can be found in many places, such as here, or in her book "Fast Cakes" which can be picked up for a few quid. I've lifted the cooking times and oven temps from her victoria sandwich recipe, which used the 7 inch tins - our oven is usually slow but I found that, for once, the lower end of the spectrum was best for me, so you might want to check it after even less than the alloted time if your oven is a bit fast! I also scaled up the icing recipe slightly to account for the fact you have to sandwich an extra layer in - I think I ended up with marginally too much but it would probably be a good amount if you did let it firm up, as it would be thicker (and harder to spread).

For the Cake
6.5oz (190g) plain flour
2 level tablespoons cocoa
1 level teaspoon bicarbonate of soda
1 level teaspoon baking powder
5oz (150g) caster sugar
2 tablespoons golden syrup
2 eggs, beaten
0.25 pint (150ml) salad, vegetable or corn oil
0.25 pint (150ml) milk


For the Icing
75g butter
6 tbsp cocoa, sieved
3 tbsp milk
225g icing sugar


To make the cake
  1. Grease and line a 7 inch sandwich tin (or more if you have them - you'll be doing 3 layers).
  2. Heat the oven to 350F, 180C, Gas Mark 4.
  3. Sift the dry ingredients into a large bowl.
  4. Beat the eggs in a separate bowl.
  5. Make a well in the centre of the dry ingredients.
  6. Add the syrup, eggs, oil and milk.
  7. Bake in the oven for 25-30 minutes, until it springs back when lightly pressed. 
  8. Turn out onto a wire rack - you don't have to wait for it to cool -  and peel off the baking paper. There's no need to wait for it to cool before doing this, it comes straight off. I don't have a wire rack so just piled the layers on top of each other on a plate as they came out.
  9. NOW leave the cakes to cool for as long as possible, preferably until they really are cool... 
To make the icing
  1. Melt the butter in a small pan, sift in the cocoa, stir to blend and cook gently for 1 minute.
  2. Sift in the icing sugar and add the milk.
  3. Remove from the heat and mix very well.
  4. Now leave it to one side, stirring it occasionally, until the icing thickens (I didn't have time to do this and wish I had).
  5. Sandwich the cakes together then put the remainder of the icing on top. 


Friday 24 February 2012

Overnight waffles - putting yeast genetics into practice


If you've been to Oxford, you might have been to G&D's, the ice cream cafe that's open until midnight every night. If you're an Oxford student, you've almost CERTAINLY been there (especially if you're a non-clubber like me). I became well acquainted with it last year when I gained a loyalty card with lots of interesting offers in Fresher's week, that culminated in a free sundae. I did mean to take a photo of that but Mum and I actually only remembered after we'd eaten it, so somewhere I have a photo of an empty plate and two spoons.

But enough of that. My point is that they do waffles.

Their waffle machine is frequently broken, often for weeks at a time. But I keep going back again and again and again. I have been known to walk miles out of my way on my waffle quest, simply because it is worth it.

But I started wanting my own waffles. So I ended up on gumtree, and then discovered that of the 3 waffle irons in the country, one was 2 miles down the road from where my boyfriend lives, and it was ancient but was only six quid. That's worth it in my books.

So I've been enviously hearing his tales of waffle batter antics from hundreds of miles away, trying yeasted waffles, non-yeasted waffles, waffles with maple syrup and so many other nuances. So when he visited me at uni this week I stipulated that the waffle iron should join him.


The fire alarms in my building are ridiculously sensitive, hence our elaborate filtering mechanism using my ancient sash windows, curtains and the extension lead from my computer (so I can't use both at once... which is my stronger desire?)


My boyfriend is the waffle king at the moment. But I get to make the next one.


Maple syrup is his standard topping, and he insisted on buying ice cream. We bought a 2 litre tub and only used about 3 scoops... oops. I hate not having a freezer but I blame Tesco for not selling anything smaller. 

They're good. They really are. We used the recipe from La Cerise, but we're trying a baking powder one tomorrow because the yeast was a bit overpowering, though I quite liked it. My room smells of beer now.

It might have been because we left it in front of the radiator overnight... but after learning about yeast for the past 2 terms and cloning yeast in practicals it was nice to see a real-world application...


I like chocolate sauce and nuts, personally. That's just the way I roll.

I don't mean I roll in chocolate and nuts. That would be weird. 


So there you have our first attempts at waffles. They won't be our last.

New Camera Excitement! Dulce de leche brownie photos...


It's here! After a long and convoluted saga involving 1 broken S2500HD being sent to me, an angry email, an upgrade, and the replacement being delivered to the wrong end of the country, I finally have my brand spanking new Fujifilm Finepix S2950 bridge camera and I adore it already. So I'm sorry that this is a rehash of an already done recipe but I've been saving a bit for my boyfriend to try when visiting, and it seemed like a good subject for trying out my 2cm super-macro!


And now that I am no longer stuck with a horrendous lens and 5 megapixels, I don't need to try and disguise my photos with pseudo-artiness and borders. Pixlromatic, you have served me well, but your services are required no more. Toodle-pip.


p.s. I have just been informed that "Toodle Pip" must now become my catchphrase. Remind me if I forget it.

Wednesday 22 February 2012

Solo Pancakes


That could be a sad title. Oh well. I'm contented in my occasional one-ness but for some recipes, it can be a right pain. It was Shrove Tuesday yesterday and I loves me some pancakes... but pancake recipes tend to contain one egg and make about 10 pancakes, which is a fat lot of good if there's one of you. Lots of people in my year here at uni overcame this issue by holding pancake parties, or cooking pancakes as a floor. I didn't. I set out to find a recipe that would scale down well (aren't I antisocial sometimes...).

But I'm happy to say that I succeeded!


It might still be too many for dessert, I'll admit, but I had them for lunch and it was the perfect amount.

Solo Pancakes

Adapted from 'Basic crepes recipe' by JENNYC819 here. I used a bizzare mixture of metric and imperial mixtures (metric for liquid and imperial for everything else) and that you shouldn't strictly do that (at least not when baking) but it was the easiest way I found to measure it. I've since added an alternative recipe at the bottom that made 3 pancakes comfortably.

2oz (60g) flour
1 egg
60ml milk
60ml water
1/4 teaspoon salt
0.5oz (15g) butter, melted


Makes 3 thickish or 4 thin pancakes in a 9ish inch frying pan.

1. Mix the flour (no need to sift unless especially lumpy, you don't need air) and egg.
2. Gradually add in the milk and water.
3. Add in the salt and melted butter, and beat until smooth.

No, that's not noise, that's the melted Stork margarine refusing to mix in properly. Bit predictable. Still, tasted fine. Just give it a good whisk before you put each batch in the pan.


CALORIES = 420 per batch


Tips for cooking:


  • Make sure your pan is really hot.
  • I swear by Fry Light. Easier and healthier than buttering or oiling the pan.
  • Re-oil the pan between every pancake.

  • Learn to flip pancakes well because it impresses people. If you undercook one side, no biggie, leave the side you just flipped to to cook for a while, then flip back over.
  • They keep warm in an oven on 100oc just fine until you've cooked them all and are ready to eat.
Toppings

These worked better with nutella than with lemon and sugar, but I think that's because I tried to cheat and use low cal granulated sweetener and a jif lemon. Go for the real things, people.

Nutella is nom.

Wrap it up goooood.
So Happy Belated Shrove Tuesday, people. I'm giving up nothing for Lent cos I'm happy with everything the way it is right now. The only thing I'd give up is worrying and then I'd worry that I wasn't giving it up well enough, and then I would be trapped in a paradox and..... *pop*

Just enjoy your darn pancakes.


Alternative mix

Makes 3 pancakes. Nice and easy to remember too!

50g flour
1 egg
50ml milk
50ml water
10g butter or margarine
1/8 tsp salt

Tuesday 21 February 2012

Dulce De Leche (Caramel) Brownies

This is going to be a short post. That's partially because I have loads of work, partially because not much needs to be said other than this: ignore what I said about making the chocolate orange drizzle cake. Ignore it and make these brownies instead. (Then make the drizzle cake afterwards).


Case in point: all 9 pieces I left in the kitchen went in under 5 hours. They are dense, chocolatey, look spectacular and taste gorgeous. Nuff said.


Thank you David Lebowitz for making an otherwise rubbish day wonderful.

Recipe can be found here. Change nothing because it is perfect.


CALORIES PER BATCH = 4448
CALORIES PER SLICE (16 SERVINGS) = 278

p.s. Dulce de leche can be bought in British supermakets as "Carnation Caramel". A tin is slightly over the cup called for in the recipe, but you could probably put it in (though I think a cup was more or less perfect)... I'm saving my leftovers to put on waffles and pancakes. Happy Shrove Tuesday! I shall be posting a pancake recipe for one if all goes well...

p.p.s. These photos SHOULD be gorgeous and hi-res and sparkly but aren't, because my new camera arrived and I got it out of the box to find that it it broken. Thanks Fuji. So I'm still stuck with the terrible phone camera for now...

Saturday 18 February 2012

Chocolate Orange Drizzle Cake

I think my words to my boyfriend when I took my first bite of this cake were "Amazeballs nomtastic omigod" (I was instant messaging, not talking, that would just be weird otherwise).

Yes, it's that good. All the other sites said that this cake had immediately gone into their top 10 favourites when they first cooked it, and I thought "ok, it's probably good, but not THAT good."

I was wrong, I freely admit it. This is one of the best cakes I have ever eaten and if you do not cook this NOW then you are being cruel to yourself by denying yourself a bite of this luscious cake.


Chocolate orange drizzle cake


I originally found the recipe here but it can also be seen here, at "The Goddess's Kitchen" which has quickly become one of my favourite blogs - I have bookmarked probably 30 recipes going through her archives today. It originally came from here, "Baking Cakes Galore", another wonderful blog. Look at all of these because then you can see just how much people like this cake! There's also a wonderful roundup here so you can get some decorating ideas. I haz no sprinkles. But I think that would probably spoil the texture anyway. Just chocolate worked for me!

For The cake
175g (6 oz) softened butter
175g (6 oz) caster sugar
3 large eggs, at room temperature
Finely grated zest of 2 oranges
175g (6 oz) self-raising flour, sifted
2 tbsp milk
For The Orange Syrup
Juice of 1 orange
100g (4 oz) granulated sugar
For The Topping
50g (2 oz) dark chocolate or milk chocolate – your choice
Sprinkles of choice (optional, I didn't bother)

CALORIES PER CAKE: ~3250

Method

1. Preheat the oven to 180°C/fan oven 160°C/350°F/Gas mark 4.
2. In a mixing bowl, add the butter and sugar and beat together until light and fluffy in appearance.
3. Add the eggs, one at a time, and beat well until fully incorporated. 
4. Add the orange zest, flour and milk and fold in gently with a spatula or large metal spoon. 

I lack a grater and therefore had to peel my orange with a potato peeler.


Don't worry, I didn't put it in like that. I chopped it up smaller. It still wasn't as thin as it would be grated, but that meant it had a slightly more rustic feel, with big chunks of zest (but not so big as to be unpleasant).


5. Turn into the prepared tin. If you're not sure how big your loaf tin is (like me), you want it about 3/4 full, which is what I mercifully ended up with. It ends up beautiful then.


6. Smooth the top of the mixture and bake in the oven on middle shelf 35 -45 minutes or until a skewer inserted into the centre comes out clean.
7. Remove from the oven and leave to cool in the tin. When cool make little holes in the cake with a skewer (I don't have a skewer, as such. I used a fork... quicker too!). This is important for pouring the syrup onto the cake to ensure the syrup soaks in fully.

I didn't let it cool fully because I was feeling a bit impatient. I put the syrup in (next stage) and took it out, and it came out of my silicone tin whilst syrupy and still fairly warm with no problems, though it was a bit nerve racking!

For The Orange Syrup

1. Put the orange juice and granulated sugar into a pan and heat gently until the sugar has dissolved. 
2. Bring to the boil and boil for a couple of minutes. (It will come to the boil fairly quickly as there's not a huge volume of liquid, so keep a close eye on it)
3. Pour over the top of the cake. 
4. When all the juice has soaked in, carefully remove the cake from the tin.

For The Topping

1. Melt the chocolate by placing a heatproof bowl over a saucepan of barely simmering water. 
2. Once the chocolate has melted, pour over the top of the cake. Either smooth the top over with a spatula or make a little pattern with the prongs of a fork. 
3. Add sprinkles if desired, leave chocolate to set before cutting into the cake. 

Is it bad that I didn't let it set? I wanted it NOW. I still want it NOW. I could have eaten the whole cake. Let me tell you, it's good warm. You don't reeaaaaaly have to let it set. Honest. 

I'll know tomorrow whether it's good cold because I have another slice to look forward to!


p.s. Please excuse the camera, the situation worsens and the noise on it today was terrible. I am really looking seriously for a cheapish digital compact - anything has to be better than my mobile...

Thursday 9 February 2012

Spinach and Feta Frittata


I've had a lifelong semi-dislike of omelettes. I don't quite know what it is, I think the egginess overwhelms me after a while. This situation wasn't helped by being asked, in a university interview, how many people you could feed with an omelette made out of an ostrich egg. I didn't have the faintest idea, not knowing how many people you would feed with a normal one, and since then I've liked omelettes even less. My Nan occasionally makes a Spanish omelette, which I quite like, but I don't count that...

But, due to some unforseen dental work, my plan to make spinach and feta macaroni cheese again didn't quite materialise and I suddenly found myself with only 1 dinner before I make a visit home for the weekend, and half a block of feta and half a bag of spinach to use up.

After some feverish reworking of my macaroni cheese recipe to try and fit it all in I concluded that it probably wouldn't work all that well. But I needed to use it up.

Here, my friend over at lovefoodthinkcook came to my rescue, extolling the virtues of frittatas. I got to wondering... would spinach and feta work? Also, would I like it?

I actually spent all of today and a good chunk of last night really looking forward to cooking my first frittata/omeletty-thing, which is possibly a little bit sad but hey-ho, I enjoy my cooking a lot now. I most certainly wasn't disappointed! I wolfed it down and have half left for a late lunch tomorrow, and I think this is one of those staple recipes that I will be going back to again and again, especially for using up leftover ingredients. It's a good thing free-range eggs are crazily cheap here in Oxford!


"Oh no, everything needs to be used up!" Spinach and Feta Frittata


My friend over at lovefoodthinkcook has a good overview of the basic frittata recipe here, but I'm the kind of girl that likes a fairly specific recipe, so I followed one by Jamie Oliver here, with a few tweaks that I'll put below.


1 small onion (I only tend to have white ones lying around so used that, original recipe says half a red one)
Fry light* or 1 teaspoon olive oil
150g fresh spinach
4 large eggs
75-100g crumbled feta cheese
Freshly ground black pepper, to taste (I have a cheap 30p shaker from Tesco. It works.)


1. Peel and finely slice the onion.

2. Preheat your grill to high**.

3. Pour enough oil into a small 7 to 8 inch ovenproof non-stick frying pan to very lightly coat the bottom (about 1 teaspoon) and put over a medium heat. If using fry light instead, a few sprays to coat the bottom of the pan works fine.

4. Add the onion and cook until just starting to brown. Add the spinach and toss for a minute or two to heat through, then remove from the heat and allow the vegetables to cool slightly.

5. Beat the eggs in a bowl. Add in the cooled spinach and red onion, followed by the feta (I crumbled it into fairly large chunks) and a good pinch of pepper.

6. Put your pan back on a medium heat and pour in the eggs. Stir around gently with a spatula until you feel the egg start to set at the bottom, then straight away, turn the heat off so the frittata stays half cooked and quite runny.

7. Carefully place your frying pan under the grill for 2 to 3 minutes (this is what the recipe said, I needed 5 plus), or until the frittata is golden and cooked through (check the center with a fork.) Put a plate over the pan and turn over quickly but carefully – the frittata should come right out (I stupidly cut it up in the pan and scratched it... sob). Serve hot or cold.


* If you haven't heard of it, Fry light is basically sunflower oil in spray form. Each spray is only 1 calorie and I have yet to find something I can't fry in it. Makes the frying process a lot healthier - I love it and don't even own any vegetable oil at the moment (something that does occasionally stop me from making certain cakes)


** The original recipe doesn't say grill, it says broiler. I still have no firm idea what that is - I think it's basically an American word for what we Brits call a grill -  just some sort of top down heating doohicky. But don't quote me on that. The grill worked absolutely fine. I guess if you didn't have a grill, if you turned the heat down on the hob after a while then you would cook through...

Tuesday 7 February 2012

Someone's Apple (or pear, or apricot) cake

Whose recipe is this? It's a mystery!


I had pears last week. I scoured the internet for hours trying to find a simple pear cake with simple ingredients.

After all that, when the pears were all eaten, Mum sent me this recipe, that could have had pears in. Ho hum. I think I probably prefer it with apples in anyway ;)

Lovely warm, not too calorific, quick to make (the longest part is dicing the apples) and easy to leave for an hour to cook. It's very forgiving if you keep opening the oven door to check it's not overflowing... after the marble cake debacle in my very first post, I have viewed my 7 inch sandwich tin with suspicion, but it said 7 inch in this recipe, and it looked very full, but it's not really designed to rise and it really is just perfect, even if the tin is very shallow like mine (so that baking tray underneath to catch spillages was completely unnecessary).

Make this if you need warming up :)

UPDATE: This seems to go very stale very quickly, not sure why. I'd definitely recommend an airtight container... then again, popping it in the microwave for 20 or 30 seconds works pretty well too!


"Someone my Mum used to know from work's apple cake that always got requested"
a.k.a. Apple or Pear cake...mmm...cake...

8oz Self raising flour
4oz Margarine
4oz Soft brown sugar-light or dark
8oz diced apple-eating or cooking or pears or apricots
1 egg
1 tsp cinnamon

1. Rub margarine into flour until it looks like breadcrumbs.
2. Mix in sugar.
3. Sprinkle spice on diced fruit then mix in.
4. Add the egg. The mixture should then be a slow dropping consistency.(spoon tapped on side of bowl)
5. Spoon into loaf or 7" round tin.
6. Sprinkle on demerera sugar for a crunchy top. (I forgot to do this, doh)
7. Cook on 190c for an hour.
8. Enjoy eating it...

Spinach, Feta and Pepperoni Pizza

I cracked it!


I love Spinach and Feta. Yum yum yum... but on it's own (well, with some onion and garlic), on top of a pizza, it felt a bit... bland. I know this is a combination that works, because I've had it before, but for me, my homemade version was missing something.

So this time I added some pepperoni. Problem solved! (Except I now have to eat pepperoni sandwiches for the next week, but I don't consider that a big hardship...) It just breaks up the spinach-y flavour a bit. Since leaving my vegetarian ways behind me this summer, I do now put too much meat into things, I think. But here, it helps, it really does.

I've also been experimenting with a new way of cooking onions amalgamated from various readings (see in the recipe for details). Whether it actually makes any difference is debatable, but it takes about the same time and tastes nice. So that works for me.


"Pepperoni makes everything better" pizza (with feta and spinach too, but who cares about them?)


For another one of my topping experiments, go here.


1 Garlic Pizza Bread
Pepperoni
100g feta
150g spinach

1 onion
1 clove garlic


1. Chop the onion and put it in a frying pan with a little oil and some garlic. Fry for about 5 minutes. Then this is what I did - I filled the pan with about an inch of water, and turned it up to max while they simmered, added a bit of sugar, some salt and some pepper, and left it, stirring occasionally, until it boiled dry.
2. Then I chucked in the spinach and stir-fried until it wilted.
3. Pop this mixture on top of your pizza
4. Top with the feta
5. Top that with the pepperoni
6. Pop it in the oven for as long as your garlic bread suggests

p.s. Mine falls apart a lot. It tastes great, but not ideal for eating with your hands (though I did anyway cos I wanted to save on washing up). If anyone can think of a way of preventing this, I'd love to hear it... (and don't say less topping, 90% of it is spinach and onion, I'm on an iron drive...)

Sunday 5 February 2012

"MsAdventures" Flourless Nutella cake


So I had a bad week. I was meant to be making this cake with someone, but they couldn't make it in the end, and I didn't want to let the 6 eggs I had bought go to waste (plus half the point was the fact that it is World Nutella Day today) so I decided to make it anyway.


I did try to think of my own thing for World Nutella Day, I really did. I went through stages of Nutella choc au pains (done), Nutella marble cake (also done). I got so far with the nutella marble cake recipe, using a peanut butter cake recipe as the base, wrote it all out.... and then realised there were several out there, and in my denial and desperate hope that I was being original, I didn't look until I was quite a way through my witchlike nutella-based potion-recipe-writing. If you'll excuse the terrible simile and over-hyphenation (oh the irony).

So yes, I will probably make my nutella marble cake at some point. And I will definitely spend the next year scheming away thinking of amazing nutella recipes no-one has thought of yet so I can surprise you all next year.

So, deciding to be safe and tread the path better-known, I went for the well reviewed recipe by one of the founders of World Nutella Day, MsAdventures in Italy. You can get the recipe on her website (see below), but I also bought the World Nutella Day ebook for my Kindle, which was only about a quid and had the recipe in too, amongst a few others (the Italian-style hot chocolate with nutella is high on my list, along with the Drunken Devil's Food Espresso Cupcakes with Nutella Filling, though I can't make cupcakes in my student kitchen because of lack of a muffin/cupcake tin. Buying the book is worth it mainly for the "10 reasons why Nutella is better than a boyfriend" list, which gave me a really good laugh.

I now have just under a kilo of nutella here too (the big jars were on offer) so there's plenty of nutella for me to use in recipes! This one seemed like the best one to celebrate the actual day, though (but I got confused and wished everyone Happy Nutella Day for tomorrow, doh...).


Well, overall it went sort of OK, though I don't know if I'd make it again. I think that's mainly my fault, because when told to whisk the eggs into stiff, not soft, peaks, I took it to an extreme and ended up with a giant ball of froth that could actually be picked up with the whisk. Still, it seemed to mix in okay, so maybe that wasn't it. There is, of course, the issue with our DEFINITELY slow/cold oven... I cooked this for 35 minutes instead of the allotted 20-30, and I still think it could have done with a few more minutes in retrospect. You can see the very different texture from the picture! It is an odd mixture of dense and very light and airy... quite bizzare. I liked it but I'm not sure how it'll go down - I always give away 9/10ths of the cake to the people on my floor, so I'm terrified they won't like it :P


Also, never substitute silicone pans for springform. Because I could NOT get this out in one piece (got covered in cocoa trying) and had to cut it up to get it out of the tin.

But you know what? I'm still sitting here really struggling not to eat the piece I've got for tomorrow, and I somewhat get the feeling that it's one of those cakes that will get better with age. So, depending on how it matures, I might make it again. I'll update you tomorrow...

Happy world Nutella day, peeps :)

Get the recipe here.

Thursday 2 February 2012

Battle of the biscuit cakes...

I like biscuit cake. It's one of those comforting things I remember Mum making quite a lot when I was younger, half with dark chocolate melted over the top, and half without because my brother was such a fussy moo :P

So the other day I decided I needed a nice simple midweek cake after a batch of banana blondies that didn't quite go to plan (don't ask). But, being on another of my weight loss drives, I didn't really get around to it.

Then today I got some bad news and, after crying for a few hours, I decided to make the cake because I had all the ingredients sitting there and I thought it would be something nice and easy.

Um. Yeah.

A little more back story is needed. I got Mum to send me the recipe she used but it calls for golden syrup, and in my student kitchen I'm just trying to keep ingredients to a minimum now. So I went and found a new recipe that called for a tin of condensed milk instead, and other than that, just chocolate and biscuits.

However, it told you to mix it all in the pan. This is where everything started to go wrong.

First of all I poured the chocolate into my springform, looked at it and thought "no, way too thin", so immediately scraped it out of my 9 inch springform and into my 7 inch sandwich tin. At this point I added about 13 broken biscuits (the recipe called for 18, and I broke 15 but just couldn't fit any more in). That sort of went okay.

Then the REAL fun began. I had to add the tin of condensed milk to my already fairly full pan, and mix it in. Suffice to say, this was a disaster. It was impossible to mix into the already thick mixture. The recipe warned you didn't have much time, so I quickly dumped it into my big bowl, mixed the quickly setting mixture so hard that I nearly became Uri Gellar's biggest rival (and vented a lot of my anger in the process), then dumped it all, fairly mixed, back into the tin and smoothed it down. Yeesh.

When I finally got it out of the tin (note to self - hairdrying it, as suggested, really does work!) there was a slight sheen of unmixed condensed milk, but it tasted sooooooo good I didn't care. If I mixed this all in a bowl next time... well, I think it might have won the battle of the biscuit cake. It's moreish, crumbly and oh-so-tasty... But I'll post both recipes and let you decide, bakers ;)

The New Recipe


Slightly modified from the recipe at "Cake in the Country"

300g plain chocolate (doesn't have to be super high quality, supermarkets own will do comfortably)
About 12-15 digestive biscuits
1 400g tin of condensed milk

If you want, put some clingfilm into the pan, it will make your life easier later. I have no clingfilm. I am a student. I used a 7 inch sandwich tin, but the original recipe doesn't specify a size.

1. Melt the chocolate in the microwave, then pour into a larger bowl
2. Add the broken biscuits and stir until they are all coated in chocolate.
3. MOVE FAST. Add the condensed milk and IT WILL START TO SET QUICKLY. Stir as well as you can and then get it in to the pan . Press down well until fairly flat and even.
4. Set in the fridge for at least 1-2 hours.
5. If you didn't put clingfilm in, attack the bottom with a hairdryer until it gets let out. This may melt the top slightly if you overdo it (I did) and you will have to re-refrigerate it.

It's not the most beautiful and stylish cake ever but goddamn it tastes good :D


Recipe 2


An old staple from an 80's Sainsbury's cookbook. Also a very good option.


125g (4oz) margarine
50g (2oz) caster sugar
2 tbsp golden syrup
2 tablespoons milk
2 tbsp drinking chocolate and 1 tbsp cocoa (I just tend to use all cocoa, maybe a little less)
250g (8oz) digestive biscuits
50g (2oz) cake crumbs (I have never put these in)
50g (2oz) glace cherries, chopped (or these, though I'd like to)
50g (2oz) raisins (these sometimes went in)


1. Place the margarine, sugar, syrup and milk into a pan and heat gently
2. Add the drinking chocolate/cocoa and half the biscuits and mix well
3. Add the remaining ingredients and stir until thoroughly mixed
4. Press into a 20cm (8 inch) sandwich tin
5. Chill in the refrigerator until set, then remove from the tin

I think Mum always used to just put melted dark chocolate on top, but the recipe suggests a chocolate icing:

125g (4oz) plain chocolate
15g (1/2oz) butter


1. Melt the chocolate and butter in a small bowl over a pan of hot water and mix well.
2. Spread over the biscuit mixture and allow to set, then cut into wedges.